ETC CORS 위반시 에러 발생,CORS 개념과 서버에서 CORS 캐싱 경험
— ETC, CORS, 2023 — 10 min read
배경
오픈소스 프로젝트에 참가하게 되었고 그 프로젝트 이슈 중 한가지를 진행하기로 했다 담당한 이슈는 cors 정책을 지키지 못해서 발생한 문제로 cors 개념을 공부하고 기록하려고 한다. 최종적으로 cors 를 발생시키는 상황을 이해하고 테스트 코드를 작성하는 것이다.
CORS 는 뭐고 탄생한 이유?
과거 모놀리식 아키텍쳐(Monolithic architecture) 에서는 클라이언트와 서버가 합쳐진 일체형 구조였다. 코드량이 늘어나고 규모가 커져서 관리하기 어려워 졌고 서바랑 클라이언트랑 분리하게 되었다 이때 웹 출처와 웹 서버의 출처가 달라지게 되는 경우도 많아졌다.
여기서 출처(Origin)가 뭐지? URL 구조의 protocol ,hostname, port 를 합친 것을 말하며 보통 port 는 생략되어 보여도 값이 항상 존재한다 (URL 의 구조)
[ http ]://[www.test.org ]:[3000]/[main]? [ page=1][protocol(Scheme)] [ host(domain)] [port] [path] [query string]
웹상에 리소스를 서로 주고 받으면서 요청을 제한하는 두가지 정책을 만들게 되었다.
1.SOP(Same-Origin Policy) 동일 출처 정책 : 같은 출처에서만 리소스를 공유할 수 있다 2.Cross-Origin Resource Sharing (CORS) 다른 출처에 있는 리소스를 가져오는 것은 굉장히 흔한일로 몇 가지 예외 조항에 해당하는 리소스 요청은 출처가 다르더라도 허용하도록 했는데, 그 중 하나가 cors 정책을 지킨 리소스 요청이다.
정리하면 다른 출처로 리소스를 사용하는것은 SOP 위반 하지만 예외 조항에 해당하는 CORS 로 리소스 요청이 가능하게 되었는데 CORS 정책을 위반하게 되었을 때 에러가 발생한다. (출처가 일치하지 않으 발생 URL 구조의 protocol ,hostname, port 중 하나라도 일치하지 않으면 발생)
CORS 와 서버간의 관계는 뭐지?
서버 간 통신을 할 때는 이 정책이 적용되지 않는다 하지만 CORS에 정책은 서버에 저장되며 저장된 CORS 정책을 브라우저에 보내주는 일을 서버가 담당한다
서버에 입력된 출처와 다르면 리소스를 사용할 수 없도록 에러를 반환하고 검증된다면 허용해주는 응답 헤더를 보낸다.
즉 브라우저에게 http 요청이 발생하고 CORS 검증이 필요시 서버에게 Preflight Request(사전요청)을 한다 서버는 검증을 하고 문제가 있다면 http 요청을 취소시키고 에러를 발생시킨다
CORS 3가지 시나리오 체험 사이트
simple Request
- 서버가 응답 헤더 'Access-Control-Allow-Origin' 를 추가 안
Access to fetch at 'https://cors-tutorial-server.herokuapp.com/api/simple/no-origin' from origin 'https://chuckchoiboi.github.io' has been blocked by CORS policy: No 'Access-Control-Allow-Origin' header is present on the requested resource. If an opaque response serves your needs, set the request mode to 'no-cors' to fetch the resource with CORS disabled.- 잘못된 출처로 요청을 보냈을 때(출처가 서버에 기록된 값과 다름)
Access to fetch at 'https://cors-tutorial-server.herokuapp.com/api/simple/bad-origin' from origin 'https://chuckchoiboi.github.io' has been blocked by CORS policy: The 'Access-Control-Allow-Origin' header has a value 'https://www.website.notcool' that is not equal to the supplied origin. Have the server send the header with a valid value, or, if an opaque response serves your needs, set the request mode to 'no-cors' to fetch the resource with CORS disabled.preflight request
- 잘못된 출처로 요청을 보냈을 때(출처가 서버에 기록된 값과 다름)
- "Access-Control-Allow-Methods" 을 지정하지 않았을
Access to fetch at 'https://cors-tutorial-server.herokuapp.com/api/preflight/bad-method' from origin 'https://chuckchoiboi.github.io' has been blocked by CORS policy: Method DELETE is not allowed by Access-Control-Allow-Methods in preflight response.- preflight request 응답 헤더에는 제대로 작성했는데 실제 simple rqeust 응답 헤더에 다른 출처를 작성 둘이 일치하지 않을떄? 제공된 오리진과 다른 경
Access to fetch at 'https://cors-tutorial-server.herokuapp.com/api/preflight/req-bad-origin' from origin 'https://chuckchoiboi.github.io' has been blocked by CORS policy: The 'Access-Control-Allow-Origin' header has a value 'https://www.website.notcool' that is not equal to the supplied origin. Have the server send the header with a valid value, or, if an opaque response serves your needs, set the request mode to 'no-cors' to fetch the resource with CORS disabled.credentialed request 인증과 관현된 정보를 담을 수 있게 해주는 옵션 :credentials 옵션
- credentials 가 include 이어서 서버에서 "Access-Control-Allow-Origin" 값을 '*' 로 끌 수 없다
Access to fetch at 'https://cors-tutorial-server.herokuapp.com/api/credentialed/wildcard-origin' from origin 'https://chuckchoiboi.github.io' has been blocked by CORS policy: The value of the 'Access-Control-Allow-Origin' header in the response must not be the wildcard '*' when the request credentials mode is 'include'.- 서버의 응답헤더에 "Access-Control-Allow-Credentials" 값이 true 로 보내지 않았을
Access to fetch at 'https://cors-tutorial-server.herokuapp.com/api/credentialed/good-origin' from origin 'https://chuckchoiboi.github.io' has been blocked by CORS policy: The value of the 'Access-Control-Allow-Credentials' header in the response is '' which must be 'true' when the request credentials mode is 'include'.CORS preflight request Caching
CORS Options Request 를 캐싱하여 HTTP Request 를 줄인다.
실제로 오픈소스에 작업해보자
CORS preflight 를 캐싱해야 하는 이유는?
CORS 검증이 필요시 서버에게 사전요청을 합니다. 서버는 검증을 하고 문제가 있다면 http 요청을 취소시키고 에러를 발생시킵니다. 모든 API 요청 전 매번 사전 요청을 발생하기 때문에 실제 요청에 걸리는 시간이 늘어납니다. 시간을 줄이고 불필요한 동일 사전요청을 보내지 않게 하기 위해서 브라우저에서 캐싱이 필요합니다.
작업순서
현제 상태를 보니 기본 cors 설정을 하고 있지만 응답이 발생할 때 header 에 추가하는 코드가 없었다
브라우저 제한: Firefox는 값을 86400(24시간)으로 제한하는 반면 모든 Chromium 기반 브라우저는 값을 7200(2시간)으로 제한합니다. 모든 API 요청 전이 아니라 2시간마다 한 번씩 이 요청을 하면 사용자 경험이 크게 향상될 수 있으며 가능한 경우 더 긴 수명이 적용되도록 더 높은 값을 설정하는 것이 쉽게 승리할 수 있습니다. https://httptoolkit.com/blog/cache-your-cors/
작업내용
처음에는 e.Use 에 미들웨어를 추가하고 테스트 케이스를 작성했다
a.gin.Use(cors.New(a.newCorsConfig())) a.gin.Use(middlewares.CORSOptionsRequestCaching(a.newCorsConfig()))func CORSOptionsRequestCaching(corsConfig cors.Config) gin.HandlerFunc { return func(c *gin.Context) { if c.Request.Method == "OPTIONS" { c.Writer.Header().Set("Access-Control-Max-Age", fmt.Sprintf("%v", corsConfig.MaxAge)) c.JSON(http.StatusNoContent, "") return } c.Next() }}func TestCORSOptionsRequestCaching(t *testing.T) { // given router := gin.Default() corsConfig := cors.DefaultConfig() corsConfig.AllowCredentials = true corsConfig.AllowOriginFunc = func(origin string) bool { return true } corsConfig.AllowHeaders = []string{"Origin", "Content-Length", "Content-Type", "Authorization"} corsConfig.MaxAge = 24 * time.Hour
router.Use(cors.New(corsConfig)) router.Use(CORSOptionsRequestCaching(corsConfig))
// when req := httptest.NewRequest(http.MethodOptions, "/", nil) req.Header.Add("Origin", "http://testSite.com")
w := httptest.NewRecorder() router.ServeHTTP(w, req)
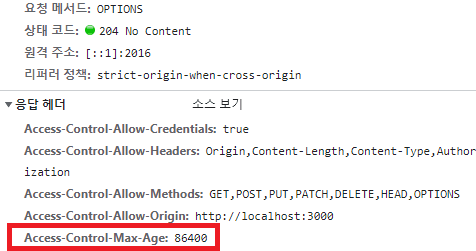
// then assert.Equal(t, "86400", w.Header().Get("Access-Control-Max-Age"))}그런데 테스트 케이스를 작성하고 테스트 하면서기존 cors 라이브러리에
MaxAge 를 설정하면 자동으로 사전요청 캐싱을 해준다는 것을 코드를 보고 알았고
테스트 케이스로 Options 메서드로 요청을 보내니
응답 헤더에 Access-Control-Max-Age 값이 존재했다.
그래서 기존 코드로 돌리고
corsConfig 값에 MaxAge 값만 24*time.Hours 를 설정하는 코드를 작성하고 pull request 를 보냇다.
실제로 회사 코드에 적용해 보니
코드를 적용 후 개발게에서 기부를 등록하는 api 를 사용해 테스트 했다 기존 개발계에서 개발자도구를 켜고 네트워크를 보았다 1.API 호출 (사전요청) (요청) 2.API 호출 (사전요청) (요청) 3.API 호출 (사전요청) (요청) 순서로 매 요청에 사전요청이 나타났다
코드를 적용 후 배포하는 처음 사전요청이 나타나고 응답헤더에 max-age 값이 나타난 것을 확인 이후 같은 api 호출시 사전요청이 네트워크에서 보이지 않았다.
1.API 호출 (사전요청) (요청) 2.API 호출 (요청) 3.API 호출 (요청)
참고
https://velog.io/@wiostz98kr/CORS%EC%9D%98-%EB%AA%A8%EB%93%A0-%EA%B2%83 https://velog.io/@guswlsapdlf/CORSCross-Origin-Resource-Sharing https://bourbonkk.tistory.com/63 https://brownbears.tistory.com/337 https://www.webperf.tips/tip/optimizing-cors/ https://auth0.com/blog/cors-tutorial-a-guide-to-cross-origin-resource-sharing/ https://echo.labstack.com/middleware/cors/ https://news.hada.io/topic?id=7453